All the photos above are from previous features on Green Wedding Shoes. The
glam gold
crown is from this featurewith headpiece by Jannie Baltzar, the
dried flower crown is from this real wedding, the boho bridesmaids are from this
wedding, the fern + flower crown is from this woodsy shoot and the bottom two
photos are from this inspirational shoot.
Ben Sasso recently sent over the photos below. Love the look of real
flowers! These were done by The Conservatorie. If you are interested in real
flowers for your wedding day, check with your florists to see if they can create
something beautiful for you! So gorgeous!
So, where can you get this look? Well, if you are looking for a crown of
real flowers, you can either DIY it yourself or I recommend having your florist
create it since it can be a bit tricky depending which type of flowers you are
using. And you want to make sure your flowers are alive and pretty when you walk
down the aisle!
Another option is to buy (or DIY since we’ll be sharing how later today!)
your flower crown. There are so many talented designers out there with their own
spin on the trend using either fabric, silk or dried flowers. Some of my faves I
recommend checking out for this trend include (starting at the top right): Twigs
& Honey, Whichgoose, Mignonne Handmade, Lo Boheme, Ruche
To begin, you’ll create the base of the flower crown out of two pieces of
floral wire. Mold and gently bend each piece into a half circle. Face the half
circles opposite of each other to create a circle and lay it over the top of
your head to check the fit. It should be quite snug as the addition of flowers
will eventually weigh the crown down. Wrap both overlapping sections tightly
with floral tape.
Before adding the flowers to the base, you’ll create several small clusters
of flowers. This avoids having to attach each flower individually and
overloading the crown with tape. Pick a flower and continue adding 4-5 flowers,
each one nestled right below the other. Tightly wrap the base with floral tape.
Trim the tips if necessary.


It’s officially Midsummer and honestly, what’s not to love about
time-honored celebrations, especially when it involves wearing wildflowers
around your head, drinking vodka and dancing around a maypole? Naturally with
our love of cultures, customs, and DIYs, we’ve partnered up with our friends
atKanon Organic Vodka on a sweet flower crown DIY for their annual Swedish
Midsummer festivities and for the ultimate contest. Participating is as simple
as liking Kanon’s Facebook page, picking your favorite Midsummer tradition,
sharing it with your friends, and winning a chic Phillip Lim bag, gorgeous
Pamela Love jewelry or much much more! Click here for more details. Good luck
& SKOL!
Once you’ve made 10-15 clusters, start adding them to the base. Position a
cluster of flowers against the outside of the wire base and wrap tightly with
floral tape. Overlap the second cluster over the first and wrap tightly with
tape. Continue layering clusters in the same direction until the entire base is
filled. Spray the crown with water or keep it in a cool place until you’re ready
to wear it!
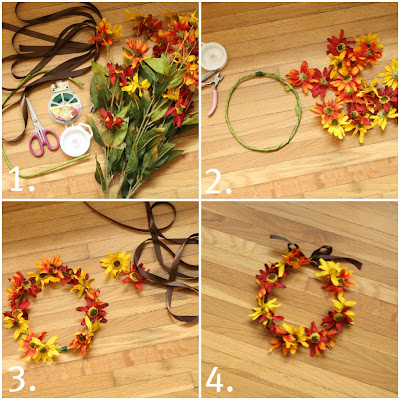
STEP 1: Get your supplies! I bought all of my supplies at Michael’s, but
any craft store should suffice. What you will need is a handful of selected silk
flowers, wire cutters/pliers, heavy rustic floral wire for the base, thin floral
wire (green) to attach the flowers, and floral tape or ribbon (both
optional).
STEP 2: Take your rustic floral wire and shape it into a circle that fits
comfortably on your head. I would suggest making it a little loose because the
flowers end up making it fit a bit snugger at the end.
STEP 3: Begin arranging your flowers on the base and decide the general
placement of the flowers prior to attaching them. Once decided, start from the
back and begin working forward. Take your thin green floral wire and secure each
flower into place by wrapping tightly around the base several times (or until
you feel like it is secure).
STEP 4: For the larger flowers, there was not enough of a stem for me to
securely attach it to the crown, so I improvised, and first went underneath the
bottom of the rose and tightly wrapped the wire underneath the green base of the
flower between the petals and the stem. Make sure to cut the wire long enough to
be able to first wrap around the bottom of the flower as well as still wrap
around the crown afterward.
STEP 5: Continue the process moving around to the front of the crown and to
the opposite side. There is really no “right” way to arrange your flowers. Just
play with it until you feel like they lie the way you like.
STEP 6: You can choose to wrap your flowers around the entire circle of the
crown, or, like I did, only go 3/4 around the base. If you decide to only go
3/4, you can finish it off by wrapping the back with floral wire or ribbon. I
decided to leave mine as it was because I liked the natural look of it. Voila!
You have yourself a flower crown!